


How to Commission Dakimakura Art: Briefs, Artists, Rights & Print-Ready Files

Just want the template? Jump to the Heart Club dakimakura template section.
A good dakimakura cover starts before the file. Before you find an artist, you need to know who should draw this character, what moment you're capturing, and what the artwork needs to do once it's printed at full size on fabric.
A dakimakura illustration isn't a regular full-size anime illustration. It has to work vertically, read at human scale, survive being wrapped around an inner pillow, and still look right when your face is three inches from the print.
At Heart Club, we commission human artists for our own dakimakura designs, and we also work with collectors printing custom commission artwork for the first time. That means we see the process from both sides: the artist brief, the template handoff, the rights questions, the final file check, and the moment where a beautiful image has to become a real fabric cover.
The same problems show up often. The artist is talented, but the brief is vague, so revisions pile up and the commission starts to lose momentum. The pose is interesting, but it does not fit the character. The file looks beautiful on a monitor, but feels awkward once printed. Someone assumes personal use and commercial rights are basically the same thing. They are not.
So let's make the expensive mistakes less expensive. This guide covers artist fit, useful briefs, front/back planning, rights, AI shortcuts to avoid, and the print checks that catch problems before fabric gets involved.
What you're actually commissioning
A dakimakura commission is usually two full illustrations: one for the front side of the cover and one for the back. In printer terms, it is a double-sided cover, so both sides need to feel intentional. Sometimes those are completely different poses. Sometimes they are variations of the same moment. Sometimes the back side is the payoff, especially for R18 versions.
But the job is bigger than "draw the character lying down." The artist is solving a very specific design problem:
- Does the character still feel like themselves in this pose?
- Does the expression match the character's emotional state in this moment?
- Will the composition work on a tall, narrow canvas?
- Are important details too close to the edge, zipper, or seam?
- Does the outfit read clearly at full scale?
- Will the color and linework survive fabric printing?
- Do the front and back feel like they belong to the same cover?
A poster can have empty space, background elements, dramatic lighting, and a composition designed to be viewed flat. A dakimakura cover works differently: the character is the composition, the fabric wraps around a pillow, and the viewer's attention moves vertically.
A good artist brief gives the artist enough structure to understand the character, mood, and technical requirements without reducing them to a rendering machine. You are not trying to control every eyelash. You are giving the artist the right target.
Start with the character, not the pose
Most weak dakimakura briefs start with a pose: "Can you draw her lying on her side?" It's not wrong, exactly. It's just not enough.
The better starting point is the character. A shy character probably should not have the same energy as a smug troublemaker; a noble, serious character shouldn't suddenly look like she wandered in from a different genre. A chaotic character can get away with a messier setup. A serene character needs softness. A confident character needs eye contact that feels intentional, not vacant.
Before you settle on the pose, ask the simpler question: would this character actually do this? That one check filters out a surprising number of expensive mistakes before the artist ever opens the canvas.
When we commission a cover, anatomy and outfit accuracy are only the baseline. We are looking for the moment: the tiny expression choices, the body language, and the difference between "this looks like the character" and "this feels like the character."
A good dakimakura cover usually has a point of view. It captures a specific mood:
- cozy and domestic
- teasing and playful
- sleepy and vulnerable
- elegant and composed
- flustered but trying to hide it
- smug because she knows exactly what she is doing
Those choices should come before the pose. The pose serves the character, not the other way around.
Choosing the right artist
Don't choose an artist just because they're technically good. Technical skill matters, obviously, but style fit matters just as much. Maybe more.
Portfolio strengths are not interchangeable. One artist may be incredible at sharp lighting and dramatic expressions; another may be better at soft, warm intimacy. The same goes for elaborate outfits, relaxed bodies, cozy faces, action art, and quiet composition. A portfolio can be excellent and still not be right for this cover.
A good match usually hits more than one of these:
- They have drawn the character before, or at least clearly like the series.
- Their natural style fits the character's archetype: soft onee-san, smug kusogaki, mecha musume, magical girl, elegant ojou, whatever the brief needs.
- They are comfortable with the content rating and tone you want.
- They have drawn dakimakura covers before, either for a circle or as a private commission.
That last point is useful, but not mandatory. Plenty of great artists can draw a strong cover without prior daki experience. They just need clear specs, patience, and a commissioner who understands that full-scale cover art is a strange format the first time you draw it.
Also check how the artist actually works. Avoid artists who use AI generation, AI finishing, or AI upscaling as part of their commission process. A dakimakura cover needs consistent anatomy, fabric logic, expression, and full-resolution control from sketch to final file. AI shortcuts tend to make those problems harder, not easier.
When looking through a portfolio, pay attention to the details that matter for this format.
Expressions
Dakimakura art lives or dies on expression. Look for artists who can draw eyes with intention: not just pretty eyes, but character-specific ones. Can they draw embarrassment without making it look generic, confidence without stiffness, or softness without losing personality?
Fabric and clothing
Covers often involve bedding, sleepwear, elaborate costumes, or alternate outfits. The artist needs to understand folds, tension, and how clothing sits on a body.
You do not need photoreal fabric physics. You do need clothing that feels drawn with care instead of pasted onto a pose.
Anatomy at full scale
Small anatomy issues become much more obvious when printed on a 160 x 50cm cover. A hand that looks fine enough in a social media preview can look strange when it is nearly life size.
Look for artists who draw relaxed bodies well. Lying poses, foreshortening, feet, and hands are all hard, and dakimakura art gives those mistakes nowhere to hide.
Character range
If you are commissioning fan art, check whether the artist can capture characters from different sources without flattening them into their default style. A strong personal style is good; a style that overwrites every character into the same face is less good.
The best match is an artist whose natural strengths already fit the character, so you are not fighting the artist's hand.
Interest matters too. An artist may technically accept a commission even if the series, character type, or content level is not something they enjoy. The result usually shows.
Where to find artists for dakimakura commissions
Most people start in the obvious places:
- Pixiv
- Skeb
- X/Twitter
- VGen
- artists' personal commission pages
- Discord communities
- BOOTH or doujin circle pages
- convention artist-alley listings
There's no single best platform. The right place depends on the artist and how they prefer to work.
Skeb is popular for anime commissions, but it's built for one-way requests: no back-and-forth, no revisions, and no request-related DMs outside the request body. Changes usually mean sending a brand-new paid request, with no guarantee the artist will accept it. That can work for simple personal art, but it is risky for a dakimakura cover if you need exact dimensions, front/back consistency, or commercial usage rights.
VGen and personal commission forms are often better when you need a structured brief, clear deliverables, revision stages, and usage terms.
X/Twitter and Pixiv are good discovery tools. They're not always good commissioning systems by themselves. If you find an artist there, look for their commission terms before sending a request. If their profile says commissions are closed, respect that.
It is also normal not to receive a reply. Many artists are busy, closed, filtering DMs, or only accepting requests through a specific form or platform. Do not take silence as a personal rejection, and do not keep pushing the same artist. Wait, follow their stated process, and keep a shortlist of other good fits.
You can commission the artist directly, or you can go through a circle or commission service that handles the artist, printing, and logistics.
The managed route can be easier, especially if you are new to the hobby or working across a language barrier. Just read the terms. Some services lower the commission cost because they keep commercial rights or can sell the design through their own storefront. That may be fine. It's not the same thing as a private personal commission.
If you want a one-off personal cover that stays private, say that early. If you want commercial rights, say that early too. The worst time to discover a rights mismatch is after the artist has already started drawing.
Before you message anyone, read the artist's terms: commercial work, R18 boundaries, print permission, and whether they accept fan art from that series. Then ask clearly: not aggressively, not with a wall of text in the first message, just enough to show that you understand the scope.
Something like:
Hi! I wanted to ask whether you are open to a dakimakura cover commission: front and back illustration, 160 x 50cm print format, personal use only. If that sounds like something you're interested in, I can send over more details so you can give me a pricing estimate.
A message like that already puts you ahead of most commission requests.
What goes into a good dakimakura comm sheet
You might see this called a comm sheet, commission sheet, or brief. The name matters less than the job: give the artist the information they need to make strong decisions without burying them under 40 screenshots, five contradictory pose references, and a paragraph explaining every scene in the character's lore.
Before listing pose details, write the premise in one sentence. Not the whole brief, just the core idea. For example:
- "She is embarrassed on the bed but trying to act composed."
- "The front side is sleepy and domestic; the back side is more flustered."
- "She just came back from training and is too tired to keep up the tough act."
That one sentence makes every smaller decision easier: pose, expression, outfit, eye contact, props, lighting, and how the front and back relate to each other. After that, the brief should answer five questions:
- Who is the character?
- What mood should the cover capture?
- What should each side show?
- What technical format does the art need?
- What rights and usage are being requested?
The brief doesn't have to be a plain text document. A marked-up image board, Canva layout, Figma page, Google Slides deck, or filled-in visual template can work well, especially when the commission has exact pose notes, outfit details, safe-area concerns, or the artist and client do not share a first language.
If you and the artist do not share a language, say so. Check their profile first. If they prefer Japanese, Korean, Chinese, or another language, translate the brief and keep your original text available too. Add a line at the top: "I used a translation tool for this message. If anything reads strangely, please ask and I can clarify." That costs you one sentence. It gives the artist room to ask instead of quietly guessing through a bad translation, and it makes your request look less like spam from someone mass-messaging artists with machine-translated text.
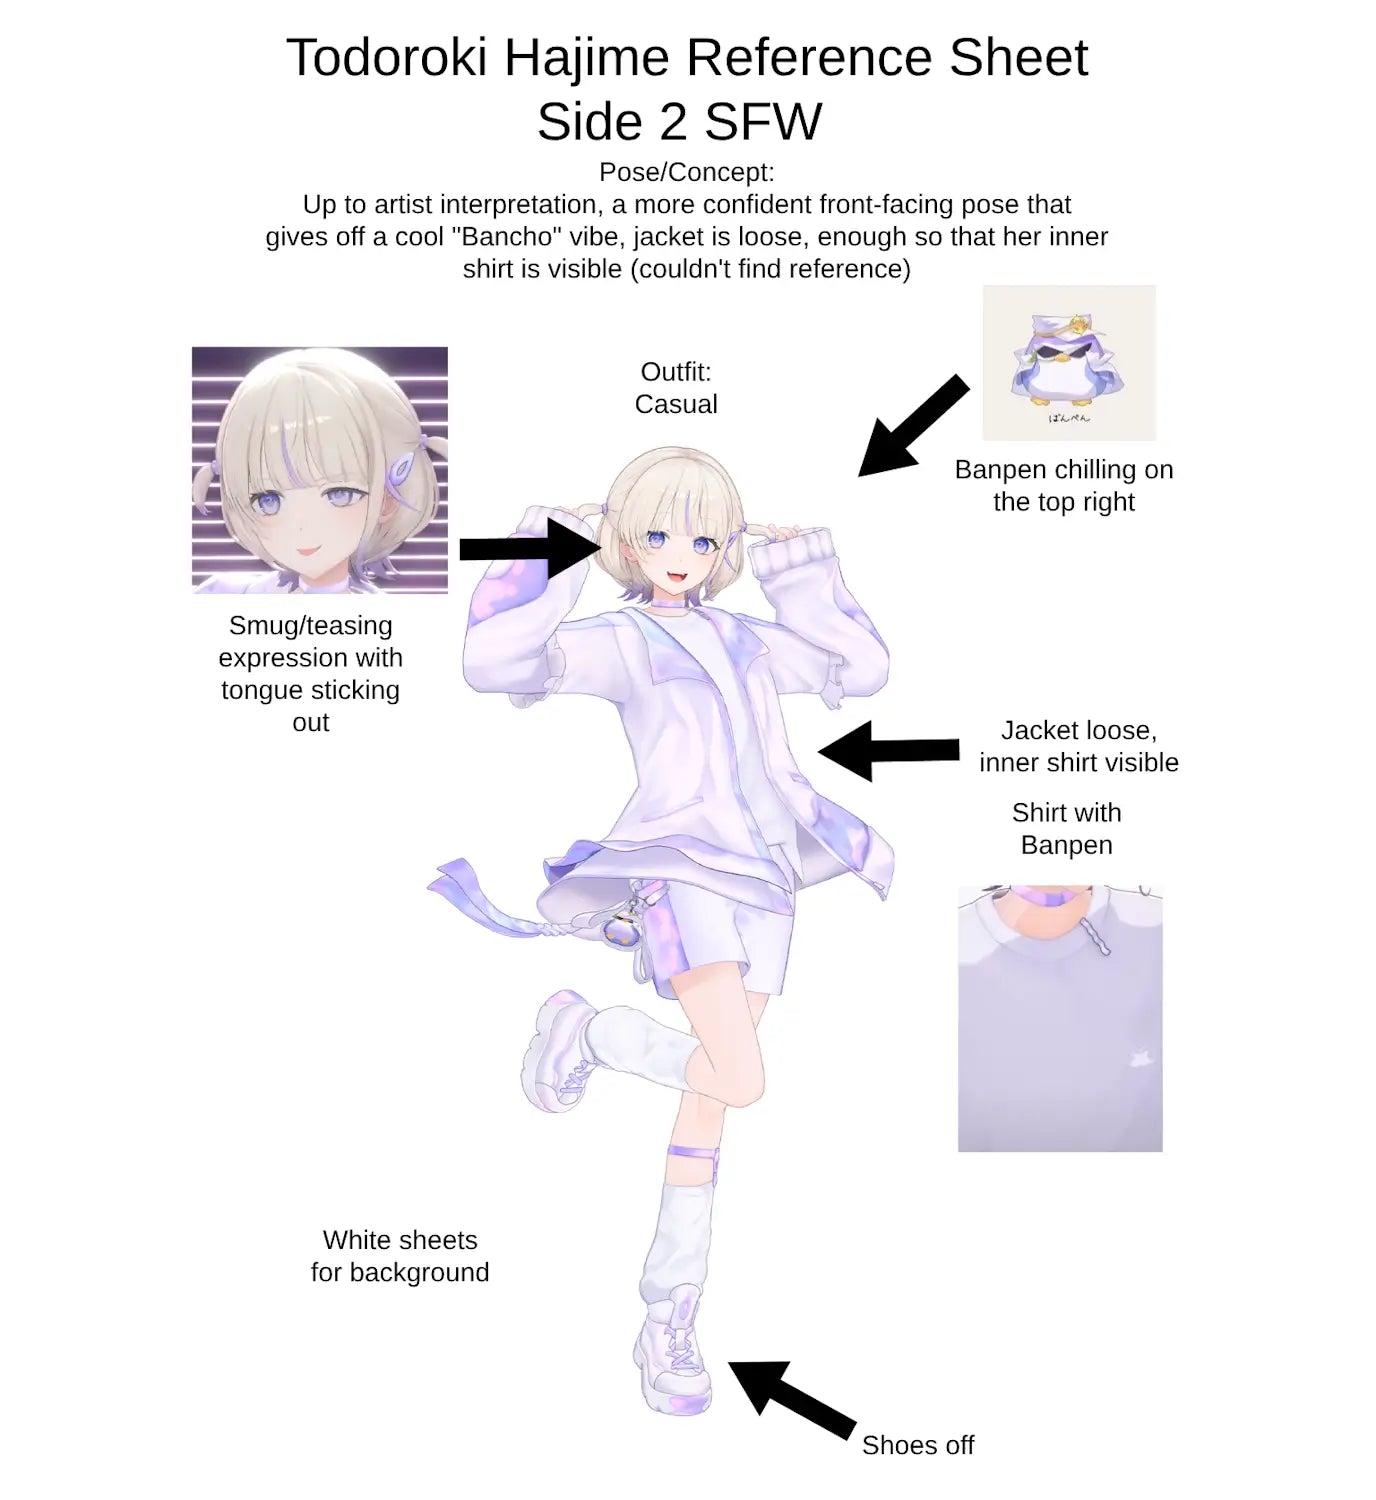
The trick is to separate requirements from taste. Use labels like "must match," "nice to have," and "artist choice." If a hand must stay away from the seam, mark it. If a pose reference is only there for mood, say that too. Visual briefs are great for removing ambiguity. They get annoying when they turn the artist into a trace machine.
"Omakase" and "surprise me" briefs can work for simple personal pieces. They are a harder fit for a full dakimakura cover, which needs at least some decisions before the first sketch: canvas dimensions, safe-area planning, and how the front and back relate to each other. If you want full artist discretion, fine. Treat it like buying a surprise, not starting a revision cycle. Make sure the artist knows that is what you are both agreeing to.
For most commissions, give the artist a clear target and then leave room for them to solve the drawing.
Dakimakura comm sheet / brief template
Project
- Commission type: dakimakura / anime body pillow cover illustration
- Use: personal print / commercial product / gift / display
- Format: front and back artwork for a 160 x 50cm cover
- Printer/template: Heart Club 540 x 1660 mm template, or the printer's required template
- Timeline: artist's estimate, milestone dates, and any fixed deadline
- Content rating: SFW / R18 / separate SFW and R18 versions
Character
- Character name:
- Series/source:
- Personality summary:
- Important traits to capture:
- Traits to avoid:
This section should be short. The artist does not need a wiki page; they need the character read.
A weak version reads like:
She is a cute anime girl. Please make her pretty.
A stronger one gives the artist something to actually draw:
She is usually calm and elegant, but she gets flustered when attention is focused on her. The expression should feel soft and slightly embarrassed, not bold or teasing.
Visual references
Include only references with a job:
- official character art
- outfit references
- hairstyle details
- color references
- screenshots showing expressions or personality
- pose references, if useful
Do not include 30 images unless each one has a job. A bloated reference folder can make the artist guess which image matters most.
Label the references so the artist knows why each one is there:
- Ref A: official outfit colors
- Ref B: hairstyle from side angle
- Ref C: expression mood
- Ref D: pose inspiration, not exact anatomy
If you can't draw, rough is fine. A stick figure layout, a photo of a posable figure, or a previous cover used only as pose inspiration can still help. You're not making art for the artist; you're removing ambiguity.
Front side concept
Describe the pose, expression, outfit, and mood, but give the artist room to solve the drawing.
Example:
Front side: relaxed lying pose, facing the viewer. Expression should be gentle and sleepy, with slight eye contact. Outfit is her standard nightwear, simplified where needed so it does not clutter the composition. Mood should feel cozy and private rather than dramatic.
Back side concept
The back side shouldn't feel like an afterthought.
If it is a separate pose, explain how it relates to the front. If it is a variation, explain what changes. If the front is SFW and the back is R18, make sure the tone still fits the character.
Example:
Back side: same setting and outfit, but more flustered. The pose can be slightly more turned away, with her looking back over her shoulder. Keep the expression embarrassed rather than confident.
That gives the back side a reason to exist instead of feeling like bonus art.
Boundaries and no-go details
Boundaries matter most for R18 or suggestive work. Be specific without getting weirdly graphic: tell the artist what not to include, and say early if the character needs to stay within certain limits.
Don't assume the artist can read your mind or wait until the sketch stage to reveal a major constraint.
Technical requirements
Attach the print template before sketching begins. If you are printing with Heart Club, use the custom dakimakura template: 540 x 1660 mm at 300 DPI. The template includes multilingual labels and head-positioning guidance, which can help when commissioning artists across different languages. It is generally safe for most dakimakura printers, but if another printer provides their own template, compare the margins, bleed, and safe areas before sending it to the artist.
Ask for:
- front and back files matched to the template
- no watermark on the final print files
- high-resolution PNG or TIFF exports
- RGB/sRGB color profile with the profile embedded, unless the printer provides a different color-profile spec
- layered source files only if agreed in advance
- background extended to the bleed edge
- face, fingers, toes, text, and other critical details kept inside the finished-size line
If the printer provides a PSD template, send it before the artist starts. Not after the art's finished.
Use the print template before the artist starts
For Heart Club custom prints, the safest move is simple: send the artist the dakimakura template before they begin sketching. The template is free to download, and it is the easiest way to prevent avoidable layout problems before the art is finished.
Free dakimakura PSD template for 160cm × 50cm covers
If you are commissioning art for a custom dakimakura cover, send your artist our free PSD template before they sketch. It includes the full 540 × 1660 mm artwork area, finished-size guide, bleed, safe-area notes, recommended head placement, and multilingual labels to make cross-language commissions easier.
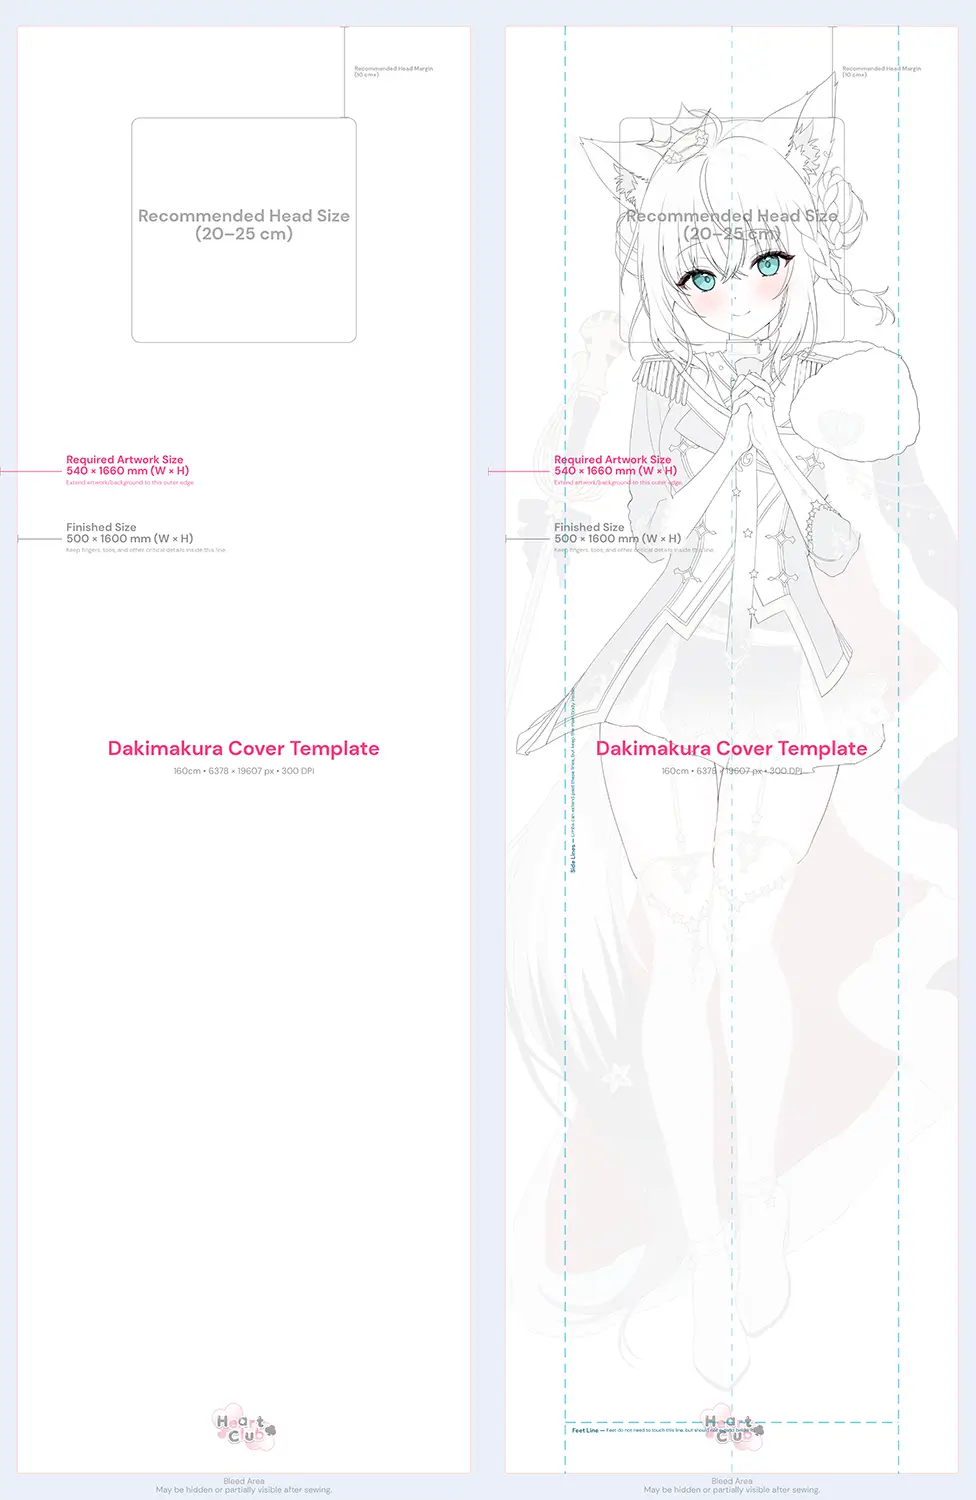
RGB, 300 DPI, 6378 × 19606 px. Built for a finished 500 × 1600 mm cover with bleed included.
Free to use for dakimakura commission planning and print preparation. Share it with your artist or printer; please do not resell, repackage, or claim it as your own.
The template isn't decoration. It tells the artist where the final cover will be cut, sewn, and wrapped around the pillow. If the artwork is made first and forced into the template later, something usually suffers: the face sits too high, fingers drift into the trim area, the background does not reach the bleed, or the whole composition feels squeezed.
Heart Club's standard 160cm dakimakura template uses:
| Area | Size |
|---|---|
| Required artwork size | 540 x 1660 mm |
| Finished cover size | 500 x 1600 mm |
| Pixel size | 6378 x 19606 px |
| Resolution | 300 DPI |
| Recommended head size | 20-25 cm |
| Recommended top head margin | 10 cm |
These numbers are for Heart Club's standard 160 x 50cm cover. If you are commissioning art for a different size or another printer, use that printer's template and safe-area rules instead of adapting these numbers by guesswork.
Note that the bleed is not uniform: about 20 mm on each side horizontally and 30 mm at the top and bottom. That is normal for this template and reflects the extra room needed for cutting, sewing, and fabric wrap.
The extra area around the finished size is the bleed. The artist should extend the background and non-critical artwork all the way to the outer edge so the printer has room to cut and sew the fabric cleanly. Anything important, including faces, hands, fingers, toes, key outfit details, text, signatures, and anything you would be sad to lose, should stay inside the finished-size line.
Think of the bleed as sacrificial canvas: it exists so the final cover looks clean, not as a place for the good stuff.
Head placement matters
The template also includes a recommended head size of 20-25 cm and a recommended top margin of 10 cm. That may sound oddly specific until you remember what a dakimakura actually is: the art isn't staying flat forever. Once the cover is on an inner pillow, the top and sides curve away from the viewer. If the character's face sits too high, it can end up on the sloped part of the pillow instead of the flatter visible area.
A beautiful face in the wrong place is still a problem, so for most covers, the face should sit comfortably below the top margin, with the head sized naturally for the character and pose. Hair, hats, accessories, and loose fabric can move closer to the edge if the composition needs it. The emotional center of the artwork should not.
Working at print size
For a standard 160 x 50cm finished cover, do not ask the artist for a 160 x 50cm image and leave it there. For Heart Club, we recommend starting from the full 540 x 1660 mm template at 300 DPI, exported at 6378 x 19606 px. It is best to think about that canvas size before the first sketch, not after the final art is already done.
That is a large file, and some artists' computers will struggle with multi-layer artwork at full size. If there is a concern, talk about it early. Reducing the working size can be okay if needed, as long as everyone understands the final print size, keeps the same proportions, and avoids resizing the finished art by guesswork later.
For fabric printing, we treat 150 DPI as a practical minimum, but we recommend working from the provided 300 DPI template whenever possible. Clean linework, stable anatomy, and consistent color matter more than chasing a massive canvas that barely opens.
SFW and R18 versions
If you want both SFW and R18 versions, plan that from the beginning. Don't commission a SFW cover and later ask the artist to just make an R18 version. That usually means redrawing more than you think; the pose, expression, outfit logic, and file setup may all need to change.
A good SFW/R18 pair feels connected: same character, same emotional logic, different level of suggestion. The safest structure is:
- same overall concept
- matching lighting and composition
- alternate outfit or expression changes
- separate deliverables for each version
- clear agreement on pricing and usage
Some artists don't accept R18 commissions. Some only accept them for certain characters or under specific terms. Respect that. Pushing an artist past their stated boundaries is a great way to make sure they never work with you again.
Printers have content rules too. If your commission is suggestive, R18, violent, age-ambiguous, or otherwise near a platform boundary, check the printer's rules before commissioning the art. Don't assume that because an artist is willing to draw it, a printer is willing to produce it.
This matters especially when using Japanese printers or specific premium fabrics. Their rules can be stricter than expected, and they can refuse a file after the artwork is already finished.
Rights, permissions, and usage
This is the part people most often get wrong: commissioning art doesn't automatically mean you own every right to it.
In most cases, unless the agreement says otherwise, the artist still owns the copyright to their work. You are paying for a specific use. That use might be personal display. It might be permission to print one cover. It might be commercial merchandise rights. Those are different things.
If you want to print a dakimakura cover for yourself, ask for personal print permission.
If you want to sell covers, you need explicit commercial merchandise rights from the artist. That should be discussed before pricing, not after the final file is delivered.
Commercial rights usually cost more, as they should. You are asking for more than an illustration; you are asking for permission to use that illustration as part of a product.
Keep these points straight:
- Get the usage agreement in writing.
- Don't assume "commissioned by me" means "owned by me."
- Don't crop, edit, recolor, or resize the art unless the artist allows it.
- Don't remove the artist's credit from public product pages if credit was part of the agreement.
- Don't use the art for extra products unless those products were included in the usage terms.
- Don't use AI tools to alter the final art.
If the artist asks for credit, decide where that credit will appear before the work starts: product page, social posts, convention signage, packaging insert, or wherever the design will be shown publicly. Credit is not a substitute for usage rights, but it is part of treating the artist properly.
Fan art adds another layer. A custom cover of an existing character may involve the character owner's IP, separate from the artist's rights. Personal prints and commercial merchandise sit in very different risk categories, so do not treat them as the same thing.
Fanwork rules are not all-or-nothing. Some franchises tolerate or explicitly allow small-scale doujin-style sales, while others are much stricter. If you are making a cover of an existing character for anything beyond personal use, check the official fanwork guidelines before you build the whole project around it. Personal printing and public merch sales are different conversations.
For personal custom prints, the core rule is simpler: get the artist's permission before printing their work. Most artists are fine with it if you ask first. They may not be fine with it if you don't.
Personal use
Personal use usually means you are commissioning art for yourself. You might print one dakimakura cover, keep it at home, maybe share photos of the finished setup with credit.
Even then, ask clearly. Some artists are fine with personal printing. Some aren't. Some charge extra for any physical print use.
Commercial use
Commercial use means the art is being used to sell something. Dakimakura covers, acrylic stands, tapestries, wallpapers, stickers, ads, product pages, anything that helps generate revenue.
For commercial work, the brief should include:
- what product the art will appear on
- how many products or categories are included
- where it will be sold
- whether the artist will be credited
- whether the usage is exclusive or non-exclusive
- whether the artist can post the work publicly
- whether edits, crops, or promotional graphics are allowed
- whether the agreement includes future reprints
Pricing and timeline
Good dakimakura art is not a $30 sketch.
Prices vary by artist, complexity, rights, file requirements, content rating, deadline, and whether you need one side or two. But if you want a polished front/back cover from a skilled anime artist, expect the price to reflect the work.
A dakimakura commission can involve character research, rough concepts, sketch approval, two finished sides, print-aware adjustments, and usage rights. Alternate versions and commercial terms add more work on top. It's not a small job.
Community pricing varies wildly. Simpler private commissions can start in the few-hundred-dollar range, while polished dakimakura work can reach several thousand dollars. Well-known artists can go far beyond that. Treat those as rough ballpark figures, not a real quote.
The payment structure also varies, but for larger dakimakura commissions, milestone payments are usually cleaner than one big payment. A simple private commission might only need a deposit and final balance. A two-sided cover, commercial-use piece, alternate SFW/R18 version, or rush job benefits from real checkpoints.
Good milestones are tied to visible progress, not vague percentages. "50% when halfway done" sounds tidy until revisions start and nobody agrees what halfway means. Better milestones look like:
- deposit to reserve the slot and start work
- payment after rough sketch approval
- payment after color proof or major rendering approval
- final payment before full-resolution print files are delivered
That structure protects both sides. The artist is not carrying the whole project on trust, and the client gets natural checkpoints to confirm the pose, expression, outfit, layout, and front/back relationship before the work gets too far along.
Other artists, especially across different regions and platforms, may do it differently. The exact structure matters less than making it clear before work begins.
Ask:
- When is payment due?
- What timeline does the artist expect for sketch, revision, rendering, and final file delivery?
- What happens if the commission is cancelled?
- How many revisions are included?
- Which changes cost extra?
- Are commercial rights included, or priced separately?
- Is privacy or non-posting included, or an extra fee?
If you are working internationally, confirm the payment method early. Transfer services like Wise can be useful for private commissions when they are available for the artist's country and currency: the artist can often receive a local bank transfer without needing a Wise account, and fees and currency conversion are usually clearer up front. Some artists still prefer platform checkout, PayPal, bank transfer, or region-specific services. For R18 commissions, payment options may be more limited because some platforms and processors restrict adult content.
If you want the commission to stay private, ask about that before the quote is finalized. Some artists charge extra for non-posting or NDA-style privacy because it limits their ability to use the finished piece in their portfolio or social feed.
The timeline can also be longer than newcomers expect. A good artist may have a queue, work in stages, and need feedback before moving forward. Commercial work may involve contracts and invoices. If the final cover is being printed afterward, production time adds another layer.
Set a rough schedule up front, even if the artist chooses the dates. You do not need to dictate the calendar, but both sides should know when sketches, revisions, rendering, and final files are expected. It sets expectations early and helps avoid commissions that never quite end.
For a serious custom dakimakura project, think in weeks or months, not days. Rush timelines are possible with some artists, but rush fees are normal. If you need art for a birthday, convention, launch, or production batch, start earlier than you think you need to; the cover will be around much longer than the deadline panic.
Revisions: how to give feedback without making everyone miserable
Revisions are part of commissioning, not a failure. The sketch stage exists because it is easier to fix structure early. Pose, expression, outfit, proportions, and the front/back relationship should be addressed before final rendering.
Good feedback is specific. Something like:
The expression is close, but she feels a little too confident. Could we make the eyes softer and the mouth more hesitant?
Vague feedback like "Can you make it more like her?" leaves the artist guessing whether you mean the eyes, the mouth, the overall vibe, or something you have not put into words yet. Specific feedback is kinder to everyone, and it gets you closer to the cover you actually want.
The process goes smoother when you:
- Consolidate feedback instead of sending tiny corrections one at a time.
- Prioritize major issues at sketch stage.
- Do not request a completely different pose after line art unless you expect to pay for it.
- Use visual references when words are not enough.
- Be honest, but do not art-direct every inch of the piece.
- Respect the number of revisions in the artist's terms.
The best commissions feel like collaboration: you know the character and the goal, and the artist knows how to make the art work. Trust that split.
Print-ready files: what to check before you print
Before sending the art to a custom dakimakura printer, check the files carefully. It's not the fun part, but it's much cheaper than noticing a problem after production starts.
Size and template
Make sure the art matches the printer's required size. If the printer has a template, use it and check both sides.
A 160 x 50cm cover should not be sent as a random phone-resolution image and scaled up. Upscaling can't invent real detail. It just makes the softness bigger.
The final file should be printed at the size the artist drew it for. Don't upscale, stretch, or resize a finished image unless the printer specifically tells you to. If the file needs to be a certain size, request that size before the artist starts.
Safe areas
Important details should not sit too close to the edges, seams, or zipper. Face, hands, fingers, toes, signature details, and outfit focal points need breathing room.
The exact safe area depends on the printer and sewing method. Use their template.
File format
Most printers accept high-resolution PNG, TIFF, or PSD files. Ask before commissioning if you are unsure, and agree on the delivery format before the artist starts exporting finals.
Don't let the final print file get trapped in a random compressed format, social-media preview, or X/Twitter DM upload. Those handoff methods can rename files, compress previews, strip useful metadata, or make it unclear which version is actually final.
If the file is too large for email or the artist does not have a clean transfer method, you're welcome to use our free Heart Club Vault service to request the files from the artist. A proper file-transfer link is much safer than passing production art through chat attachments.
Layered source files aren't automatic. Artists often charge more for them, and many do not provide them at all. For printing, a properly exported flattened file is usually enough.
Line quality
Check the artwork two ways before printing.
First, view it at 100% to look for line quality, artifacts, rough edges, and accidental marks. That check is about the pixels themselves.
Then view the artwork at roughly life size. Modern tools like Photoshop, GIMP, and even Windows image viewing apps can display an image close to real-world scale if your monitor size or DPI is calibrated correctly. To sanity-check it, hold a sheet of paper against the screen and make sure an on-screen A4 or Letter-size reference matches the real page.
This physical-scale check tells you whether the art reads properly as a cover. Tiny details that look sharp at pixel level may be too subtle once the artwork is seen at full dakimakura scale, while anatomy or layout issues that felt harmless in a small preview can become much more obvious.
Color
Screens glow; fabric doesn't.
For most custom dakimakura prints, sRGB with an embedded color profile is the safest default unless the printer gives you a specific profile or color workflow. Wide-gamut spaces like Display P3 or Adobe RGB, and especially files with no embedded profile, can shift unpredictably when they are opened, previewed, or converted for print.
Colors that look intense on a monitor can print differently on 2-Way Tricot. Deep shadows can lose detail. Very subtle blush or pale linework can become harder to see. Highly saturated colors may shift depending on printer calibration and fabric.
If the printer offers a color proof or test print, take it seriously. Fabric changes color behavior, and a proof can show whether shadows are too heavy, blush is too faint, or saturation needs adjustment before the full print run.
No watermarks
Final print files should not include watermark text, sample overlays, compression artifacts, or social media preview marks. That sounds obvious, but it still happens.
Final approval
Before handing off the files, open them at full size, zoom in on the edges, and look at both sides one more time so the correct version is the one you actually send.
AI references and why we avoid them
Don't use AI-generated images as the foundation for your dakimakura commission. A lot of people treat AI images like harmless reference boards, but they can push the artist toward generic anatomy, weird fabric logic, inconsistent details, and a pose that only works because the image is cheating.
Some artists will reject the commission the moment they see an AI reference. Use official art, screenshots, manga panels, pose photos, bedding references, written mood notes, or a rough stick-figure layout instead.
A bad sketch from a human is often more useful than a polished AI image: the sketch shows intent even when the lines are rough, while the AI image just looks finished without ever deciding what it was trying to say.
At Heart Club, we don't use AI generation, AI upscaling, or AI touch-ups at any stage. Not for finals, not for placeholders, not for quick references. The work stays human from brief to finished file. For the longer version, read why we commission human artists and say no to AI art.
If you already have art
If you already commissioned art and just need it printed, check three things before uploading it anywhere:
- Do you have permission to print it?
- Is it large enough for the cover size?
- Does it fit the printer's template?
If the answer to any of those is unclear, pause before printing. A beautiful illustration can still make a poor dakimakura cover if it was not composed for the format. Cropping a portrait into a 160 x 50cm layout rarely works cleanly; you may lose hands, hair, outfit details, or the whole emotional center of the piece.
If you are commissioning new art, ask for the dakimakura format from the beginning. If you are adapting existing art, talk to the artist first.
Printing can reward a strong brief; it can't rescue a weak one, no matter how large the file or how nice the fabric.
TL;DR
- A dakimakura commission is print art for a tall fabric cover, not a regular illustration.
- Start with the character's personality and mood before choosing a pose.
- Pick an artist whose style naturally fits the character.
- Write a clear one-sentence premise and label your references.
- Send the print template before sketching starts. For Heart Club, use our recommended 540 x 1660 mm template at 300 DPI, exported at 6378 x 19606 px, for a finished 500 x 1600 mm cover.
- Keep faces, fingers, toes, and other critical details inside the finished-size line. Bleed is for background and non-critical art.
- Ask for permission before printing. Personal print permission and commercial merchandise rights are different.
- Plan SFW/R18 versions, usage terms, payment, and revisions before the art starts.
- Avoid AI references. Use official art, screenshots, pose references, written notes, and rough human sketches.
Frequently asked questions
How much does it cost to commission dakimakura art?
Prices vary by artist, complexity, number of sides, content rating, deadline, and usage rights. A polished front-and-back dakimakura commission is a serious illustration project, not a quick sketch. Personal-use usually costs less than commercial merch rights. Before judging a quote, ask what it includes: two finished sides, revision time, print formatting, source files, usage rights, privacy, or rush work.
Should I pay for a dakimakura art commission all at once?
Not always. For a smaller private commission, a deposit and final balance may be enough. For a larger two-sided cover, commercial-use piece, or SFW/R18 set, milestone payments are usually better. Tie payment to clear checkpoints: sketch approval, color or rendering approval, and final print-file delivery. The artist shouldn't have to finish the whole project on trust, and the client shouldn't have to guess whether progress matches the payment schedule.
Is a dakimakura the same as an anime body pillow cover?
Usually, yes. Dakimakura is the Japanese term most collectors use, while anime body pillow cover is the plain-English version people search for when they are new to the format.
What DPI should dakimakura art be?
Work at the printer's requested size and resolution. For Heart Club's standard 160cm custom dakimakura cover, we recommend 300 DPI using our 540 x 1660 mm template, exported at 6378 x 19606 px. For fabric printing, 150 DPI can be a practical minimum when the art is clean and correctly sized.
Should dakimakura art be RGB or CMYK?
Use RGB unless your printer explicitly asks for CMYK. Most reputable dakimakura and fabric printers now expect sRGB/RGB files with the color profile embedded, then handle the final print conversion themselves. Do not convert to CMYK just because the file is “for print”; it can flatten colors before the printer's own color workflow touches it.
Can I commission dakimakura art for an OC or VTuber?
Yes! OC and VTuber dakimakura commissions can work well if the artist has enough references: front and back design details, outfit notes, personality cues, expression references, and any model or brand rules that matter. If you are a VTuber making a dakimakura of yourself, plan around a 160cm cover unless your printer specifically uses a smaller format; we still see a lot of outdated 150cm specs in VTuber commission briefs. If the cover will be sold commercially, make sure you have the rights to use the character, model design, and artwork for merch.
What size should dakimakura art be?
Use your printer's template first. Seriously, this is the part that saves people from expensive mistakes. For Heart Club's standard 160cm custom dakimakura cover, we recommend using our 540 x 1660 mm template at 300 DPI, exported at 6378 x 19606 px. The finished cover size is 500 x 1600 mm, and the extra space is bleed for cutting and sewing. If you are printing somewhere else, use that printer's template instead of relying on generic pixel advice.
What is bleed on a dakimakura template?
Bleed is extra artwork outside the final finished size. It may be trimmed away, sewn into the seam, or land at the very edge depending on production tolerance. The artist should extend the background and non-critical art into the bleed so the final cover has no blank edges. Important details should stay inside the finished-size line.
Where should the character's head go on a dakimakura cover?
For Heart Club's template, the recommended head size is 20-25 cm with a recommended 10 cm margin from the top. The face should sit comfortably on the flatter visible area of the pillow, not too high where the cover curves away. Hair, hats, and accessories can move closer to the edge if needed. The face should not.
Do I need separate art for the front and back?
Usually, yes. The back side is half the cover, not bonus art. A standard dakimakura cover has a front side and a back side, and those can be two different poses, two variations of the same pose, or SFW/R18 paired versions. The important thing is that both sides feel intentional.
Can I use existing fan art for a custom dakimakura cover?
Only if you have permission from the artist. Finding an image online doesn't mean it's free to print. Even if the print is just for personal use, ask first. Many artists are fine with personal printing if print use is part of the agreement. Some aren't. Respect their terms. If you want commercial use, you need explicit commercial rights.
Can I commission dakimakura art of an existing anime character?
Many artists accept fan art commissions, including dakimakura-style commissions, but each artist has their own rules. Some avoid certain franchises. Some avoid R18 work. Some allow personal use but not commercial use. For personal projects, ask the artist clearly. For commercial products, IP rights become more complicated.
Should I commission SFW and R18 versions at the same time?
Yes, if you know you want both. Planning them together helps the artist keep the pose, expression, lighting, and file setup consistent. Adding an R18 version later may require more redrawing than expected, and not every artist will be comfortable with that request.
Can I use AI art as a reference for the commission?
Skip it. AI references tend to create more problems than they solve: strange anatomy, inconsistent clothing, generic expressions, and design logic that doesn't hold up under scrutiny. Many artists won't work from AI-generated images at all. Use official art, screenshots, pose references, written notes, and rough human sketches instead.
What file format should I ask the artist for?
Ask your printer first. Boring answer, correct answer. In most cases, a high-resolution PNG or TIFF export is enough for printing. PSD or layered source files may be useful, but they aren't automatically included in commissions. If you want the source file, discuss it before the artist quotes the project. Final print files should be full resolution, unwatermarked, and matched to the printer's template.
How long does a dakimakura commission take?
Expect weeks, sometimes months. The timeline depends on the artist's queue, the complexity of the art, revision stages, whether there are two sides or multiple versions, and whether commercial rights are involved. If you need the finished cover by a specific date, work backward from printing and shipping time. Start early. The art is the part you don't want rushed.
Resources
For more on dakimakura materials, care, and Heart Club's production philosophy:
- Custom Dakimakura Cover Printing
- Download the free Heart Club custom dakimakura PSD template
- 2-Way Tricot fabric options
- A Comprehensive Guide to Dakimakuras as a Hobby, the community guide often called the Daki Bible, which heavily inspired this guide
About Heart Club
Heart Club makes dakimakura covers illustrated by human artists, printed on soft fabric, and made to feel at home in a real collection. No AI generation, no AI upscaling, no AI touch-ups. Every cover gets its own artist search, its own brief, and a careful path from sketch to finished cover.
If this guide helps one commission land cleaner before the art becomes a cover, it did its job.


